The Perfect SaaS Customer Onboarding Form Template (Free to Use)
Yuvin Kim
15 มิ.ย. 2569
The Perfect SaaS Customer Onboarding Form Template (Free to Use)
Yuvin Kim
15 มิ.ย. 2569
How to Capture Actionable User Personas and Reduce Time-to-Value (TTV) Without Onboarding Friction
1. The Onboarding Dilemma—Data vs. Friction
The definitive metric that dictates the survival of a modern SaaS product is Time-to-Value (TTV)—the clock speed at which a newly registered user moves from their initial login to their first "Aha-moment" where they realize the platform’s actual utility.
To shorten this path, product and customer success teams need to know exactly who the user is. Without understanding their industry, job role, or intended use case, the application is forced to display a generic, unconfigured dashboard. This lack of personalization leaves the user confused and significantly extends their journey to realizing value.
The Problem: The Danger of Sign-Up Churn
This requirement creates a fundamental conflict between sales velocity and product intelligence:
The Ingestion Trap: To qualify marketing leads and customize the user experience, companies often build long onboarding forms that demand details like job titles, company size, phone numbers, and preferred integrations right after account creation.
Cognitive Fatigue: Forcing users through a wall of mandatory dropdowns and input fields right after registration creates immediate cognitive friction. Instead of exploring the software, users exit the tab, resulting in high sign-up drop-offs.
The Product Management Paradox: The more data your sales and product teams demand upfront to personalize the user experience, the fewer users you will actually have left to personalize it for.
The Objective: The 3-Step High-Density Data Model
To break this bottleneck, software companies must abandon long, static registration forms and adopt a lean, responsive framework.
`[ Long Static Form ] ──> High Cognitive Friction ──> Drop-off / Abandonment
[ Dynamic 3-Step Model ] ──> Contextual Branching ──> High Conversion + Clean Data`
This guide defines an optimized 3-step onboarding data model designed to maintain high sign-up conversion rates while gathering rich profile information. We will show you how to leverage Walla’s conditional logic engines and inline layout elements to build a smart, responsive onboarding pipeline that captures critical data without disrupting the user experience.
2. The Golden Rules of SaaS Onboarding UX
Before designing individual form fields, you must establish the psychological framework of the onboarding user experience. When a user logs into a new software platform, their motivation is high, but their patience is exceptionally low. To prevent drop-offs, the interface must minimize friction while maximizing the user's perceived return on investment.
A high-converting onboarding experience follows three core psychological rules:
Rule 1: One Question per Screen (Mitigating Cognitive Load)
Presenting a user with a long page containing ten different text and dropdown inputs creates immediate visual fatigue. It signals that your product is complex and demanding.
Discrete Interaction Cards: Break your onboarding questionnaire into a multi-page sequence that displays only one functional category per screen.
The Illusion of Speed: Answering three consecutive single-click screens feels significantly faster and less demanding to a user than scrolling through a single page containing three dense paragraphs of fields. This approach keeps the user focused and moving steadily forward.
Rule 2: Save the Hardest for Last (Graduated Commitment)
Interaction design must account for cognitive inertia. If you ask a user to type out a detailed paragraph about their business goals on the very first screen, they are highly likely to close the tab.
Micro-Conversions First: Start the sequence with effortless, low-friction selections (e.g., clickable cards to select a job title or department).
Leveraging Sunk Cost: Once a user has completed two or three simple clicks, they develop a sense of investment in the process. By placing open-ended text questions or advanced configuration inputs at the end of the sequence, you leverage this momentum—making them far more likely to complete the final inputs rather than abandoning their progress.
Rule 3: Frame with Immediate Reward (The Continuous Value Proposition)
Users do not fill out onboarding forms out of generosity toward your sales or data analysis teams; they do it because they expect a better product experience. If your form feels like an interrogation, it will fail.
UX Framing Shift: Never phrase questions around what your company wants to know. Frame them around what the user is about to gain.
Contextual Value Anchors: Throughout the form layout, display a clear, continuous reminder of the benefit of completing the setup. Instead of a generic header like "Onboarding Survey," use a dynamic value statement: "Tell us your role so we can configure your automated workspace layout." This simple framing turns a tedious data collection step into a personalized concierge experience.
3. The 3-Step Anatomy of the Perfect Onboarding Template
To build an onboarding loop that balances user conversion with business intelligence, your form structure must capture exactly three types of information. Each question should serve a direct purpose for either your engineering, product, or sales teams.
Below is the foundational blueprint of an optimized 3-step onboarding form layout:
Onboarding Form Architecture Blueprint
Step | Core Question | Data Type | Business Intent |
|---|---|---|---|
Step 1: Persona Identification | "What is your current job role or function?" | Pre-defined Single Choice (Visual Cards) | Customizes the default workspace UI layout and informs marketing segment categorization. |
Step 2: Outcome Mapping | "What is the primary goal you want to achieve with this tool this quarter?" | Objective-focused Multiple Choice / Short Text | Maps the user's specific success metrics to guide them directly to their core Aha-moment. |
Step 3: Firmographic Qualification | "How many team members are in your organization?" / "What tools are in your stack?" | Size Range Dropdown / Checkboxes | Distinguishes between self-serve product-led growth (PLG) users and high-value Enterprise Sales Leads (MQLs). |
Operational Breakdown of the 3-Step Model
Step 1: Persona Identification
Instead of opening a generic text block, use a clean list of clickable visual cards representing common customer roles (e.g., Product Manager, Growth Marketer, Content Creator, Engineer).
Product Personalization: If a user selects "Growth Marketer," the application can automatically highlight marketing integration options on their first login, rather than showing a generic dashboard.
Marketing Segments: This choice tags the user account in your background systems, enabling targeted, role-specific email tips during their trial period.
Step 2: Outcome Mapping
This question establishes what the user expects to accomplish with your software. You need to know exactly what success looks like for them to ensure they find value quickly.
Locating the Friction: If a user indicates their goal is to "Automate weekly reporting," your onboarding system knows to guide them directly toward setting up report templates, bypassing unrelated analytics dashboards.
Contextual Retention Tracking: Your analytics team can monitor whether users who select a specific goal are successfully completing the actions required to reach it, highlighting areas where users might be dropping off.
Step 3: Firmographic Qualification
The final step collects organizational metrics to help categorize your accounts and manage sales routing.
The Scale Trigger: Asking about team size or existing tool sets helps filter your user base automatically.
Strategic Segmentation: Accounts indicating small team sizes (e.g., 1–10 employees) route seamlessly into automated self-serve onboarding paths. Conversely, accounts showing enterprise scale (e.g., 500+ employees) are immediately flagged for direct outreach by your sales team.
4. Implementing Smart Routing Logic with Walla
An onboarding form should never treat a small startup founder the same way it treats an enterprise procurement director. If you send a high-value corporate lead into a generic self-serve sandbox, they may leave due to a lack of guidance. Conversely, forcing a solo developer into a mandatory sales call introduces unnecessary friction into your self-serve growth model.
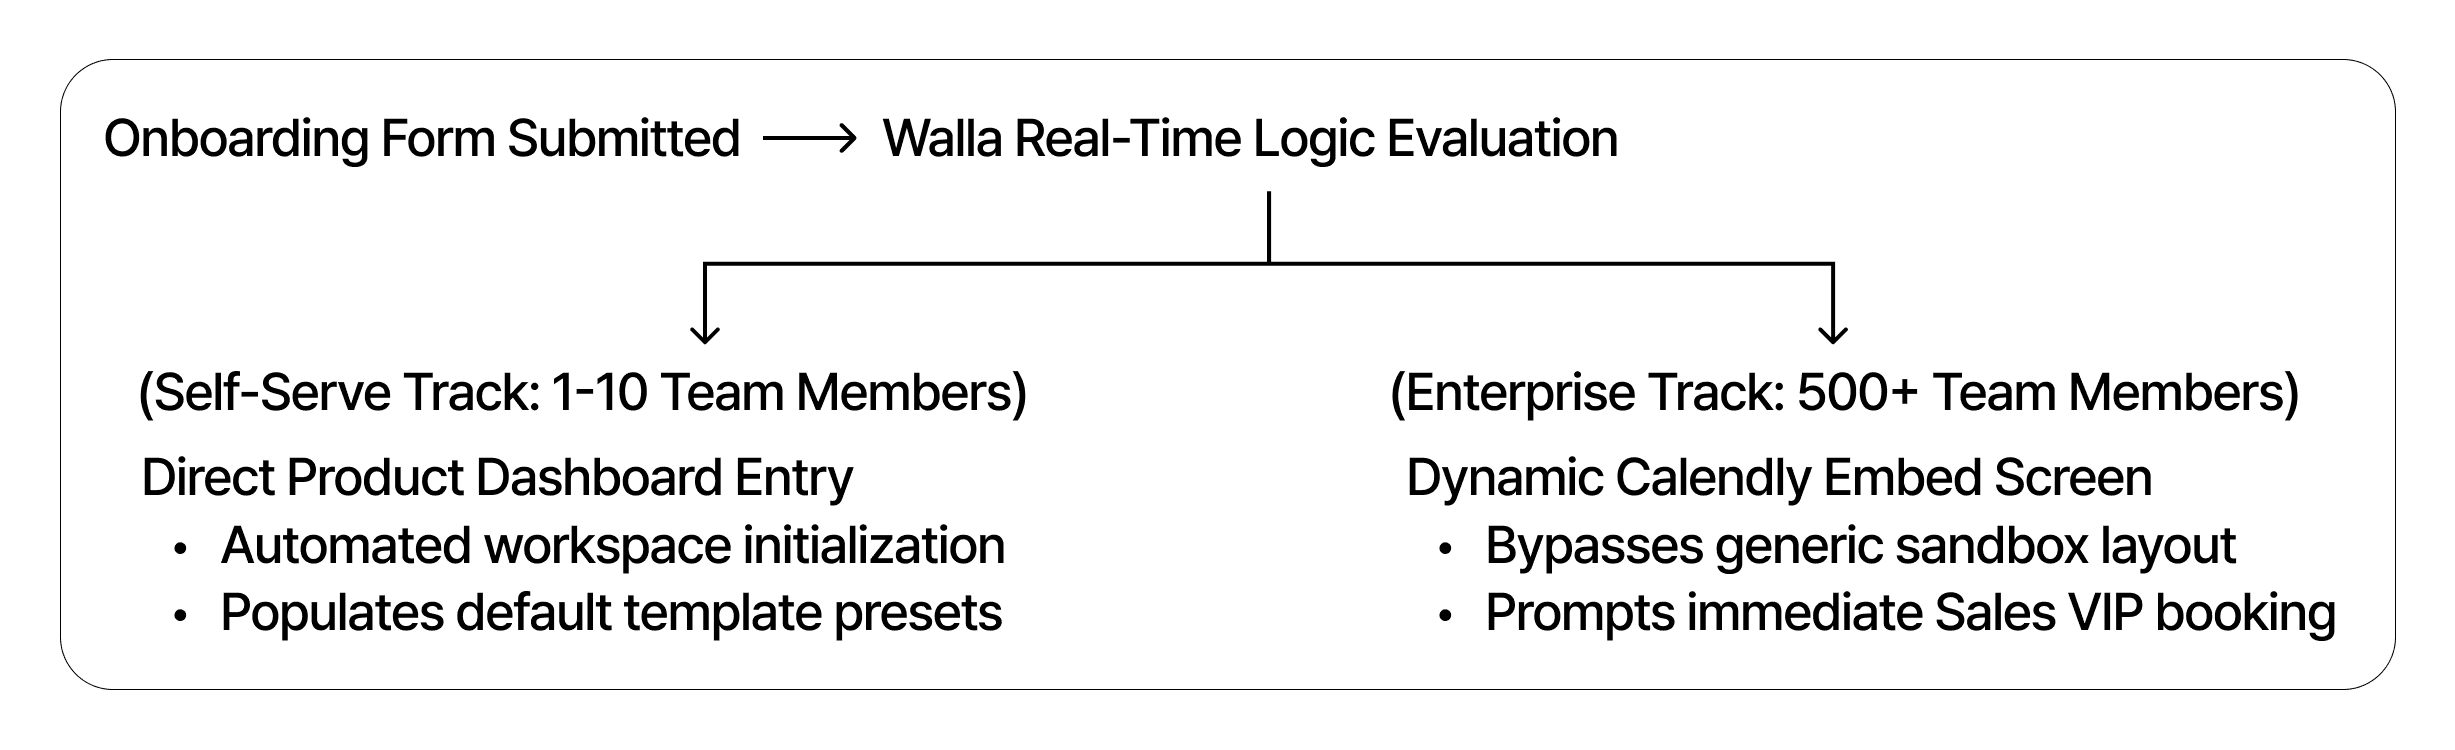
Walla’s real-time Conditional Logic Engine evaluates user answers during submission, dynamically altering the user journey based on the value of the account.
The Smart Onboarding Routing Pipeline
The diagram below outlines the dynamic routing logic executed at the infrastructure layer the moment a user completes the onboarding steps:
How to Build Dynamic Branching Paths
You can configure these routing behaviors within the Walla dashboard using conditional logic paths based on firmographic data.
Path A: The Automated Self-Serve Engine (1–10 Employees)
For accounts indicating a small team size, your primary metric is speed-to-activation. You want to clear their path and get them into the product immediately.
Logic Rule:
IF Step 3 (Team Size) EQUALS "1-10".Action Execution: Configure the form's completion screen to trigger an automatic redirect. Pass the user's role choice straight to your application via URL query parameters, like:
https://app.yourproduct.com/dashboard?onboarded=true&role=marketerResult: The user bypasses manual onboarding reviews and lands straight inside a workspace pre-configured with marketing templates, helping them realize product value as fast as possible.
Path B: The VIP Enterprise Accelerator (500+ Employees)
When a user represents a 500+ person corporation, they represent significant annual recurring revenue (ARR). This user should be fast-tracked to a high-touch sales conversation.
Logic Rule:
IF Step 3 (Team Size) EQUALS "500+".Action Execution: Instead of redirecting to the standard dashboard, configure Walla to route this user to a dedicated Conditional Ending Page.
The In-Line Embed Solution: Rather than simply displaying a text link like "Please contact sales," you can embed a live Calendly or HubSpot Meeting widget directly into the final screen layout.
Result: The high-value prospect can book a live product demonstration or sales call immediately, without ever leaving the onboarding flow. This approach captures high-intent leads when their interest is highest, turning a standard sign-up into an active sales opportunity.
Now that the smart routing logic is established, let's explore how to sync this information across the rest of your operations. Should we move on to Section 5: Activating the Onboarding Data Pipeline to map out the webhooks for Segment, Mixpanel, and HubSpot?
5. Activating the Onboarding Data Pipeline
Onboarding data is only useful if it reaches the systems that power your product analysis and sales strategies. If user profiles are trapped in an isolated database, your product managers cannot track behavioral trends, and your sales team cannot follow up on valuable leads.
By setting up an automated data pipeline, you can split and route Walla onboarding inputs to your product analytics engine and your CRM simultaneously.
(1) Product Analytics Track: Segment & Mixpanel Integration
To understand how different user types interact with your platform, you must link their onboarding answers to their subsequent behavior inside the application.
Mapping User Properties: When a user completes the onboarding form, Walla passes their data via Webhooks, which your frontend application or integration middleware (like Zapier) can capture to forward these traits directly to data routers like Segment or analytics tools like Mixpanel as global User Properties.
JavaScript
Cohort Analysis Enhancement: Saving these attributes allows your product team to run targeted cohort analyses in Mixpanel. Instead of looking at general user behavior, you can filter your charts to answer specific questions, such as: "Do users who choose 'Automate weekly reporting' during onboarding retain better than those who select 'Team collaboration'?" This gives you a clear look at which features drive actual retention for each user type.
(2) CRM & Revenue Track: HubSpot & Salesforce Synchronization
For high-value corporate accounts, your onboarding pipeline must double as a marketing qualified lead (MQL) generation engine. If an enterprise-sized client signs up, their data needs to land in your CRM immediately.
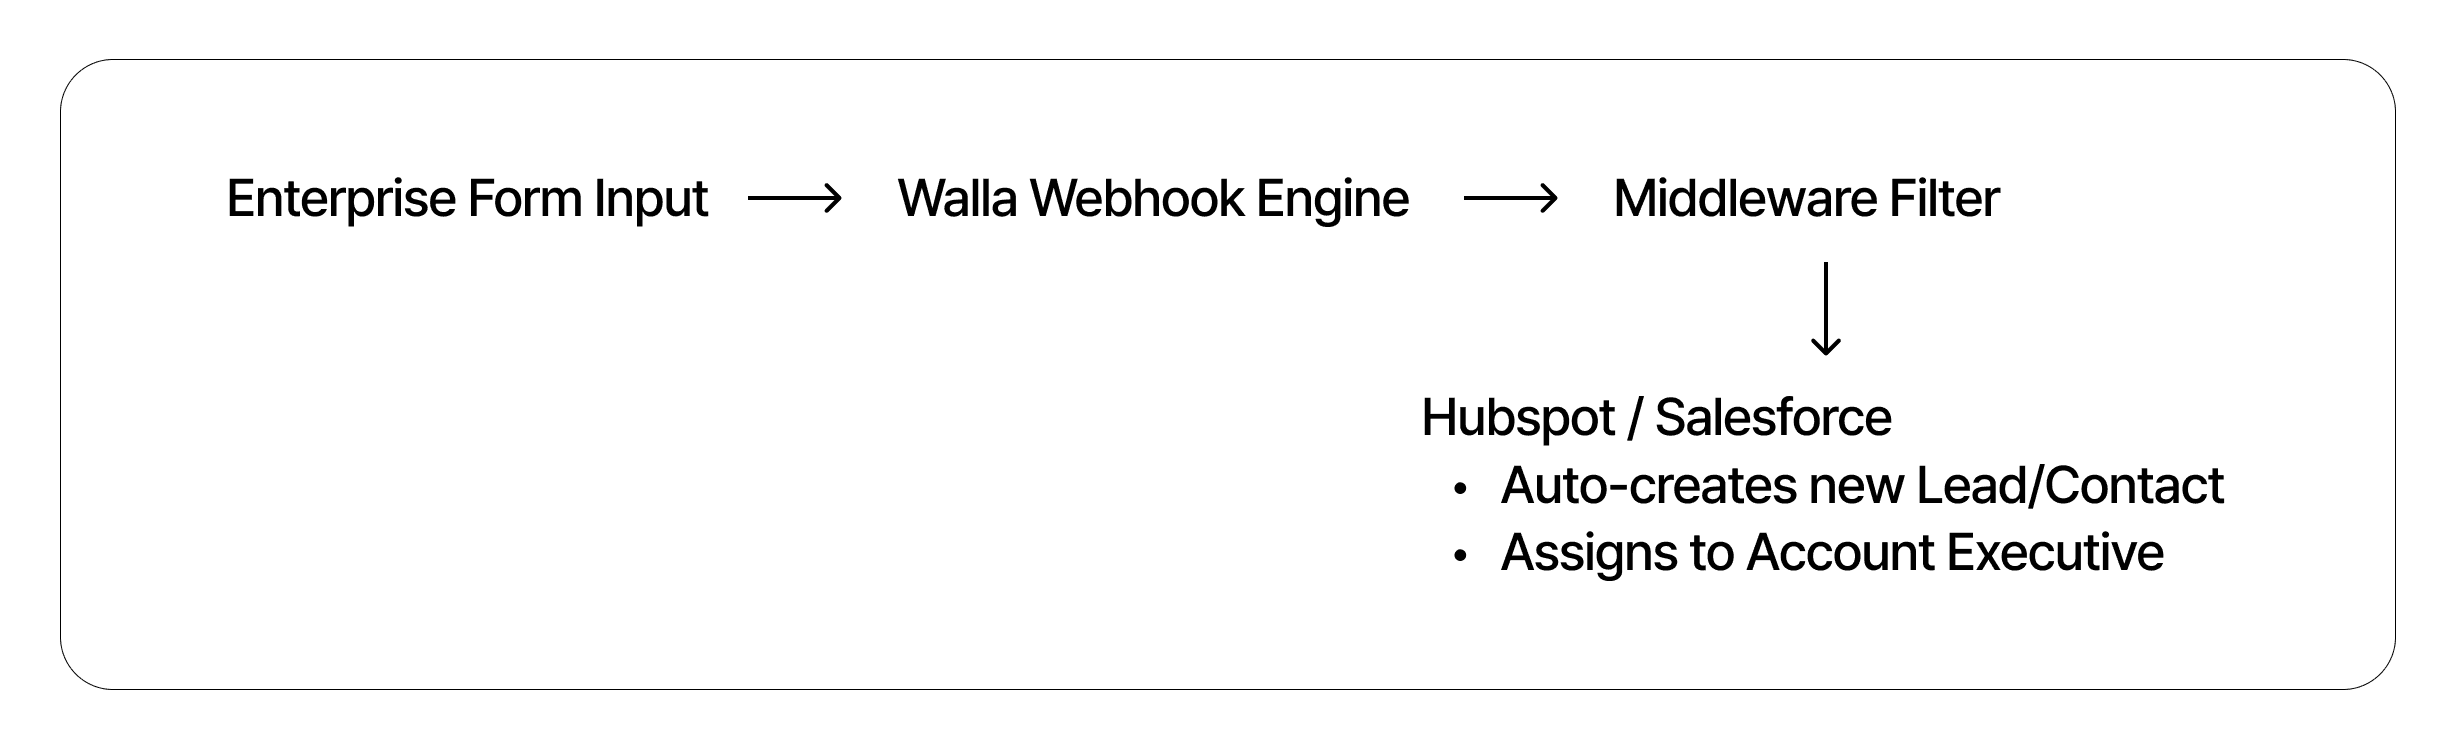
Automated Webhook Mapping: You can configure a Walla webhook to monitor your onboarding form responses. When a submission matches your enterprise criteria (e.g., 500+ employees), the webhook sends the data straight to HubSpot or Salesforce.
Preventing Lead Loss: The pipeline automatically creates a new contact and company record, maps the user's answers to custom fields, and flags the lead for direct outreach. This automated transfer ensures your sales team receives enriched context about the prospect's goals and organization size without requiring manual data entry or causing delays.
6. Conclusion: Personalization is the New Standard
Even the most sophisticated SaaS platforms cannot survive if they fail to engage users during the critical initial onboarding window. First impressions matter. If a user lands on a generic, unconfigured dashboard, they are likely to leave before ever realizing the value of your product.
Using a structured onboarding template allows you to gather high-density user data intelligently without hurting your sign-up conversion rates. The goal of this initial intake is not to create administrative hurdles, but to gather the vital insights required to deliver a tailored, contextual product experience from day one. When you segment users by their specific roles and objectives, you can guide them directly to their first "Aha-moment." Building a personalized onboarding pipeline is your first and strongest line of defense against early customer churn.
Build Your Optimized Onboarding Pipeline Today
Stop forcing every user through the same generic workflow. Capture actionable personas and route high-value leads automatically.
How to Capture Actionable User Personas and Reduce Time-to-Value (TTV) Without Onboarding Friction
1. The Onboarding Dilemma—Data vs. Friction
The definitive metric that dictates the survival of a modern SaaS product is Time-to-Value (TTV)—the clock speed at which a newly registered user moves from their initial login to their first "Aha-moment" where they realize the platform’s actual utility.
To shorten this path, product and customer success teams need to know exactly who the user is. Without understanding their industry, job role, or intended use case, the application is forced to display a generic, unconfigured dashboard. This lack of personalization leaves the user confused and significantly extends their journey to realizing value.
The Problem: The Danger of Sign-Up Churn
This requirement creates a fundamental conflict between sales velocity and product intelligence:
The Ingestion Trap: To qualify marketing leads and customize the user experience, companies often build long onboarding forms that demand details like job titles, company size, phone numbers, and preferred integrations right after account creation.
Cognitive Fatigue: Forcing users through a wall of mandatory dropdowns and input fields right after registration creates immediate cognitive friction. Instead of exploring the software, users exit the tab, resulting in high sign-up drop-offs.
The Product Management Paradox: The more data your sales and product teams demand upfront to personalize the user experience, the fewer users you will actually have left to personalize it for.
The Objective: The 3-Step High-Density Data Model
To break this bottleneck, software companies must abandon long, static registration forms and adopt a lean, responsive framework.
`[ Long Static Form ] ──> High Cognitive Friction ──> Drop-off / Abandonment
[ Dynamic 3-Step Model ] ──> Contextual Branching ──> High Conversion + Clean Data`
This guide defines an optimized 3-step onboarding data model designed to maintain high sign-up conversion rates while gathering rich profile information. We will show you how to leverage Walla’s conditional logic engines and inline layout elements to build a smart, responsive onboarding pipeline that captures critical data without disrupting the user experience.
2. The Golden Rules of SaaS Onboarding UX
Before designing individual form fields, you must establish the psychological framework of the onboarding user experience. When a user logs into a new software platform, their motivation is high, but their patience is exceptionally low. To prevent drop-offs, the interface must minimize friction while maximizing the user's perceived return on investment.
A high-converting onboarding experience follows three core psychological rules:
Rule 1: One Question per Screen (Mitigating Cognitive Load)
Presenting a user with a long page containing ten different text and dropdown inputs creates immediate visual fatigue. It signals that your product is complex and demanding.
Discrete Interaction Cards: Break your onboarding questionnaire into a multi-page sequence that displays only one functional category per screen.
The Illusion of Speed: Answering three consecutive single-click screens feels significantly faster and less demanding to a user than scrolling through a single page containing three dense paragraphs of fields. This approach keeps the user focused and moving steadily forward.
Rule 2: Save the Hardest for Last (Graduated Commitment)
Interaction design must account for cognitive inertia. If you ask a user to type out a detailed paragraph about their business goals on the very first screen, they are highly likely to close the tab.
Micro-Conversions First: Start the sequence with effortless, low-friction selections (e.g., clickable cards to select a job title or department).
Leveraging Sunk Cost: Once a user has completed two or three simple clicks, they develop a sense of investment in the process. By placing open-ended text questions or advanced configuration inputs at the end of the sequence, you leverage this momentum—making them far more likely to complete the final inputs rather than abandoning their progress.
Rule 3: Frame with Immediate Reward (The Continuous Value Proposition)
Users do not fill out onboarding forms out of generosity toward your sales or data analysis teams; they do it because they expect a better product experience. If your form feels like an interrogation, it will fail.
UX Framing Shift: Never phrase questions around what your company wants to know. Frame them around what the user is about to gain.
Contextual Value Anchors: Throughout the form layout, display a clear, continuous reminder of the benefit of completing the setup. Instead of a generic header like "Onboarding Survey," use a dynamic value statement: "Tell us your role so we can configure your automated workspace layout." This simple framing turns a tedious data collection step into a personalized concierge experience.
3. The 3-Step Anatomy of the Perfect Onboarding Template
To build an onboarding loop that balances user conversion with business intelligence, your form structure must capture exactly three types of information. Each question should serve a direct purpose for either your engineering, product, or sales teams.
Below is the foundational blueprint of an optimized 3-step onboarding form layout:
Onboarding Form Architecture Blueprint
Step | Core Question | Data Type | Business Intent |
|---|---|---|---|
Step 1: Persona Identification | "What is your current job role or function?" | Pre-defined Single Choice (Visual Cards) | Customizes the default workspace UI layout and informs marketing segment categorization. |
Step 2: Outcome Mapping | "What is the primary goal you want to achieve with this tool this quarter?" | Objective-focused Multiple Choice / Short Text | Maps the user's specific success metrics to guide them directly to their core Aha-moment. |
Step 3: Firmographic Qualification | "How many team members are in your organization?" / "What tools are in your stack?" | Size Range Dropdown / Checkboxes | Distinguishes between self-serve product-led growth (PLG) users and high-value Enterprise Sales Leads (MQLs). |
Operational Breakdown of the 3-Step Model
Step 1: Persona Identification
Instead of opening a generic text block, use a clean list of clickable visual cards representing common customer roles (e.g., Product Manager, Growth Marketer, Content Creator, Engineer).
Product Personalization: If a user selects "Growth Marketer," the application can automatically highlight marketing integration options on their first login, rather than showing a generic dashboard.
Marketing Segments: This choice tags the user account in your background systems, enabling targeted, role-specific email tips during their trial period.
Step 2: Outcome Mapping
This question establishes what the user expects to accomplish with your software. You need to know exactly what success looks like for them to ensure they find value quickly.
Locating the Friction: If a user indicates their goal is to "Automate weekly reporting," your onboarding system knows to guide them directly toward setting up report templates, bypassing unrelated analytics dashboards.
Contextual Retention Tracking: Your analytics team can monitor whether users who select a specific goal are successfully completing the actions required to reach it, highlighting areas where users might be dropping off.
Step 3: Firmographic Qualification
The final step collects organizational metrics to help categorize your accounts and manage sales routing.
The Scale Trigger: Asking about team size or existing tool sets helps filter your user base automatically.
Strategic Segmentation: Accounts indicating small team sizes (e.g., 1–10 employees) route seamlessly into automated self-serve onboarding paths. Conversely, accounts showing enterprise scale (e.g., 500+ employees) are immediately flagged for direct outreach by your sales team.
4. Implementing Smart Routing Logic with Walla
An onboarding form should never treat a small startup founder the same way it treats an enterprise procurement director. If you send a high-value corporate lead into a generic self-serve sandbox, they may leave due to a lack of guidance. Conversely, forcing a solo developer into a mandatory sales call introduces unnecessary friction into your self-serve growth model.
Walla’s real-time Conditional Logic Engine evaluates user answers during submission, dynamically altering the user journey based on the value of the account.
The Smart Onboarding Routing Pipeline
The diagram below outlines the dynamic routing logic executed at the infrastructure layer the moment a user completes the onboarding steps:
How to Build Dynamic Branching Paths
You can configure these routing behaviors within the Walla dashboard using conditional logic paths based on firmographic data.
Path A: The Automated Self-Serve Engine (1–10 Employees)
For accounts indicating a small team size, your primary metric is speed-to-activation. You want to clear their path and get them into the product immediately.
Logic Rule:
IF Step 3 (Team Size) EQUALS "1-10".Action Execution: Configure the form's completion screen to trigger an automatic redirect. Pass the user's role choice straight to your application via URL query parameters, like:
https://app.yourproduct.com/dashboard?onboarded=true&role=marketerResult: The user bypasses manual onboarding reviews and lands straight inside a workspace pre-configured with marketing templates, helping them realize product value as fast as possible.
Path B: The VIP Enterprise Accelerator (500+ Employees)
When a user represents a 500+ person corporation, they represent significant annual recurring revenue (ARR). This user should be fast-tracked to a high-touch sales conversation.
Logic Rule:
IF Step 3 (Team Size) EQUALS "500+".Action Execution: Instead of redirecting to the standard dashboard, configure Walla to route this user to a dedicated Conditional Ending Page.
The In-Line Embed Solution: Rather than simply displaying a text link like "Please contact sales," you can embed a live Calendly or HubSpot Meeting widget directly into the final screen layout.
Result: The high-value prospect can book a live product demonstration or sales call immediately, without ever leaving the onboarding flow. This approach captures high-intent leads when their interest is highest, turning a standard sign-up into an active sales opportunity.
Now that the smart routing logic is established, let's explore how to sync this information across the rest of your operations. Should we move on to Section 5: Activating the Onboarding Data Pipeline to map out the webhooks for Segment, Mixpanel, and HubSpot?
5. Activating the Onboarding Data Pipeline
Onboarding data is only useful if it reaches the systems that power your product analysis and sales strategies. If user profiles are trapped in an isolated database, your product managers cannot track behavioral trends, and your sales team cannot follow up on valuable leads.
By setting up an automated data pipeline, you can split and route Walla onboarding inputs to your product analytics engine and your CRM simultaneously.
(1) Product Analytics Track: Segment & Mixpanel Integration
To understand how different user types interact with your platform, you must link their onboarding answers to their subsequent behavior inside the application.
Mapping User Properties: When a user completes the onboarding form, Walla passes their data via Webhooks, which your frontend application or integration middleware (like Zapier) can capture to forward these traits directly to data routers like Segment or analytics tools like Mixpanel as global User Properties.
JavaScript
Cohort Analysis Enhancement: Saving these attributes allows your product team to run targeted cohort analyses in Mixpanel. Instead of looking at general user behavior, you can filter your charts to answer specific questions, such as: "Do users who choose 'Automate weekly reporting' during onboarding retain better than those who select 'Team collaboration'?" This gives you a clear look at which features drive actual retention for each user type.
(2) CRM & Revenue Track: HubSpot & Salesforce Synchronization
For high-value corporate accounts, your onboarding pipeline must double as a marketing qualified lead (MQL) generation engine. If an enterprise-sized client signs up, their data needs to land in your CRM immediately.
Automated Webhook Mapping: You can configure a Walla webhook to monitor your onboarding form responses. When a submission matches your enterprise criteria (e.g., 500+ employees), the webhook sends the data straight to HubSpot or Salesforce.
Preventing Lead Loss: The pipeline automatically creates a new contact and company record, maps the user's answers to custom fields, and flags the lead for direct outreach. This automated transfer ensures your sales team receives enriched context about the prospect's goals and organization size without requiring manual data entry or causing delays.
6. Conclusion: Personalization is the New Standard
Even the most sophisticated SaaS platforms cannot survive if they fail to engage users during the critical initial onboarding window. First impressions matter. If a user lands on a generic, unconfigured dashboard, they are likely to leave before ever realizing the value of your product.
Using a structured onboarding template allows you to gather high-density user data intelligently without hurting your sign-up conversion rates. The goal of this initial intake is not to create administrative hurdles, but to gather the vital insights required to deliver a tailored, contextual product experience from day one. When you segment users by their specific roles and objectives, you can guide them directly to their first "Aha-moment." Building a personalized onboarding pipeline is your first and strongest line of defense against early customer churn.
Build Your Optimized Onboarding Pipeline Today
Stop forcing every user through the same generic workflow. Capture actionable personas and route high-value leads automatically.
How to Capture Actionable User Personas and Reduce Time-to-Value (TTV) Without Onboarding Friction
1. The Onboarding Dilemma—Data vs. Friction
The definitive metric that dictates the survival of a modern SaaS product is Time-to-Value (TTV)—the clock speed at which a newly registered user moves from their initial login to their first "Aha-moment" where they realize the platform’s actual utility.
To shorten this path, product and customer success teams need to know exactly who the user is. Without understanding their industry, job role, or intended use case, the application is forced to display a generic, unconfigured dashboard. This lack of personalization leaves the user confused and significantly extends their journey to realizing value.
The Problem: The Danger of Sign-Up Churn
This requirement creates a fundamental conflict between sales velocity and product intelligence:
The Ingestion Trap: To qualify marketing leads and customize the user experience, companies often build long onboarding forms that demand details like job titles, company size, phone numbers, and preferred integrations right after account creation.
Cognitive Fatigue: Forcing users through a wall of mandatory dropdowns and input fields right after registration creates immediate cognitive friction. Instead of exploring the software, users exit the tab, resulting in high sign-up drop-offs.
The Product Management Paradox: The more data your sales and product teams demand upfront to personalize the user experience, the fewer users you will actually have left to personalize it for.
The Objective: The 3-Step High-Density Data Model
To break this bottleneck, software companies must abandon long, static registration forms and adopt a lean, responsive framework.
`[ Long Static Form ] ──> High Cognitive Friction ──> Drop-off / Abandonment
[ Dynamic 3-Step Model ] ──> Contextual Branching ──> High Conversion + Clean Data`
This guide defines an optimized 3-step onboarding data model designed to maintain high sign-up conversion rates while gathering rich profile information. We will show you how to leverage Walla’s conditional logic engines and inline layout elements to build a smart, responsive onboarding pipeline that captures critical data without disrupting the user experience.
2. The Golden Rules of SaaS Onboarding UX
Before designing individual form fields, you must establish the psychological framework of the onboarding user experience. When a user logs into a new software platform, their motivation is high, but their patience is exceptionally low. To prevent drop-offs, the interface must minimize friction while maximizing the user's perceived return on investment.
A high-converting onboarding experience follows three core psychological rules:
Rule 1: One Question per Screen (Mitigating Cognitive Load)
Presenting a user with a long page containing ten different text and dropdown inputs creates immediate visual fatigue. It signals that your product is complex and demanding.
Discrete Interaction Cards: Break your onboarding questionnaire into a multi-page sequence that displays only one functional category per screen.
The Illusion of Speed: Answering three consecutive single-click screens feels significantly faster and less demanding to a user than scrolling through a single page containing three dense paragraphs of fields. This approach keeps the user focused and moving steadily forward.
Rule 2: Save the Hardest for Last (Graduated Commitment)
Interaction design must account for cognitive inertia. If you ask a user to type out a detailed paragraph about their business goals on the very first screen, they are highly likely to close the tab.
Micro-Conversions First: Start the sequence with effortless, low-friction selections (e.g., clickable cards to select a job title or department).
Leveraging Sunk Cost: Once a user has completed two or three simple clicks, they develop a sense of investment in the process. By placing open-ended text questions or advanced configuration inputs at the end of the sequence, you leverage this momentum—making them far more likely to complete the final inputs rather than abandoning their progress.
Rule 3: Frame with Immediate Reward (The Continuous Value Proposition)
Users do not fill out onboarding forms out of generosity toward your sales or data analysis teams; they do it because they expect a better product experience. If your form feels like an interrogation, it will fail.
UX Framing Shift: Never phrase questions around what your company wants to know. Frame them around what the user is about to gain.
Contextual Value Anchors: Throughout the form layout, display a clear, continuous reminder of the benefit of completing the setup. Instead of a generic header like "Onboarding Survey," use a dynamic value statement: "Tell us your role so we can configure your automated workspace layout." This simple framing turns a tedious data collection step into a personalized concierge experience.
3. The 3-Step Anatomy of the Perfect Onboarding Template
To build an onboarding loop that balances user conversion with business intelligence, your form structure must capture exactly three types of information. Each question should serve a direct purpose for either your engineering, product, or sales teams.
Below is the foundational blueprint of an optimized 3-step onboarding form layout:
Onboarding Form Architecture Blueprint
Step | Core Question | Data Type | Business Intent |
|---|---|---|---|
Step 1: Persona Identification | "What is your current job role or function?" | Pre-defined Single Choice (Visual Cards) | Customizes the default workspace UI layout and informs marketing segment categorization. |
Step 2: Outcome Mapping | "What is the primary goal you want to achieve with this tool this quarter?" | Objective-focused Multiple Choice / Short Text | Maps the user's specific success metrics to guide them directly to their core Aha-moment. |
Step 3: Firmographic Qualification | "How many team members are in your organization?" / "What tools are in your stack?" | Size Range Dropdown / Checkboxes | Distinguishes between self-serve product-led growth (PLG) users and high-value Enterprise Sales Leads (MQLs). |
Operational Breakdown of the 3-Step Model
Step 1: Persona Identification
Instead of opening a generic text block, use a clean list of clickable visual cards representing common customer roles (e.g., Product Manager, Growth Marketer, Content Creator, Engineer).
Product Personalization: If a user selects "Growth Marketer," the application can automatically highlight marketing integration options on their first login, rather than showing a generic dashboard.
Marketing Segments: This choice tags the user account in your background systems, enabling targeted, role-specific email tips during their trial period.
Step 2: Outcome Mapping
This question establishes what the user expects to accomplish with your software. You need to know exactly what success looks like for them to ensure they find value quickly.
Locating the Friction: If a user indicates their goal is to "Automate weekly reporting," your onboarding system knows to guide them directly toward setting up report templates, bypassing unrelated analytics dashboards.
Contextual Retention Tracking: Your analytics team can monitor whether users who select a specific goal are successfully completing the actions required to reach it, highlighting areas where users might be dropping off.
Step 3: Firmographic Qualification
The final step collects organizational metrics to help categorize your accounts and manage sales routing.
The Scale Trigger: Asking about team size or existing tool sets helps filter your user base automatically.
Strategic Segmentation: Accounts indicating small team sizes (e.g., 1–10 employees) route seamlessly into automated self-serve onboarding paths. Conversely, accounts showing enterprise scale (e.g., 500+ employees) are immediately flagged for direct outreach by your sales team.
4. Implementing Smart Routing Logic with Walla
An onboarding form should never treat a small startup founder the same way it treats an enterprise procurement director. If you send a high-value corporate lead into a generic self-serve sandbox, they may leave due to a lack of guidance. Conversely, forcing a solo developer into a mandatory sales call introduces unnecessary friction into your self-serve growth model.
Walla’s real-time Conditional Logic Engine evaluates user answers during submission, dynamically altering the user journey based on the value of the account.
The Smart Onboarding Routing Pipeline
The diagram below outlines the dynamic routing logic executed at the infrastructure layer the moment a user completes the onboarding steps:
How to Build Dynamic Branching Paths
You can configure these routing behaviors within the Walla dashboard using conditional logic paths based on firmographic data.
Path A: The Automated Self-Serve Engine (1–10 Employees)
For accounts indicating a small team size, your primary metric is speed-to-activation. You want to clear their path and get them into the product immediately.
Logic Rule:
IF Step 3 (Team Size) EQUALS "1-10".Action Execution: Configure the form's completion screen to trigger an automatic redirect. Pass the user's role choice straight to your application via URL query parameters, like:
https://app.yourproduct.com/dashboard?onboarded=true&role=marketerResult: The user bypasses manual onboarding reviews and lands straight inside a workspace pre-configured with marketing templates, helping them realize product value as fast as possible.
Path B: The VIP Enterprise Accelerator (500+ Employees)
When a user represents a 500+ person corporation, they represent significant annual recurring revenue (ARR). This user should be fast-tracked to a high-touch sales conversation.
Logic Rule:
IF Step 3 (Team Size) EQUALS "500+".Action Execution: Instead of redirecting to the standard dashboard, configure Walla to route this user to a dedicated Conditional Ending Page.
The In-Line Embed Solution: Rather than simply displaying a text link like "Please contact sales," you can embed a live Calendly or HubSpot Meeting widget directly into the final screen layout.
Result: The high-value prospect can book a live product demonstration or sales call immediately, without ever leaving the onboarding flow. This approach captures high-intent leads when their interest is highest, turning a standard sign-up into an active sales opportunity.
Now that the smart routing logic is established, let's explore how to sync this information across the rest of your operations. Should we move on to Section 5: Activating the Onboarding Data Pipeline to map out the webhooks for Segment, Mixpanel, and HubSpot?
5. Activating the Onboarding Data Pipeline
Onboarding data is only useful if it reaches the systems that power your product analysis and sales strategies. If user profiles are trapped in an isolated database, your product managers cannot track behavioral trends, and your sales team cannot follow up on valuable leads.
By setting up an automated data pipeline, you can split and route Walla onboarding inputs to your product analytics engine and your CRM simultaneously.
(1) Product Analytics Track: Segment & Mixpanel Integration
To understand how different user types interact with your platform, you must link their onboarding answers to their subsequent behavior inside the application.
Mapping User Properties: When a user completes the onboarding form, Walla passes their data via Webhooks, which your frontend application or integration middleware (like Zapier) can capture to forward these traits directly to data routers like Segment or analytics tools like Mixpanel as global User Properties.
JavaScript
Cohort Analysis Enhancement: Saving these attributes allows your product team to run targeted cohort analyses in Mixpanel. Instead of looking at general user behavior, you can filter your charts to answer specific questions, such as: "Do users who choose 'Automate weekly reporting' during onboarding retain better than those who select 'Team collaboration'?" This gives you a clear look at which features drive actual retention for each user type.
(2) CRM & Revenue Track: HubSpot & Salesforce Synchronization
For high-value corporate accounts, your onboarding pipeline must double as a marketing qualified lead (MQL) generation engine. If an enterprise-sized client signs up, their data needs to land in your CRM immediately.
Automated Webhook Mapping: You can configure a Walla webhook to monitor your onboarding form responses. When a submission matches your enterprise criteria (e.g., 500+ employees), the webhook sends the data straight to HubSpot or Salesforce.
Preventing Lead Loss: The pipeline automatically creates a new contact and company record, maps the user's answers to custom fields, and flags the lead for direct outreach. This automated transfer ensures your sales team receives enriched context about the prospect's goals and organization size without requiring manual data entry or causing delays.
6. Conclusion: Personalization is the New Standard
Even the most sophisticated SaaS platforms cannot survive if they fail to engage users during the critical initial onboarding window. First impressions matter. If a user lands on a generic, unconfigured dashboard, they are likely to leave before ever realizing the value of your product.
Using a structured onboarding template allows you to gather high-density user data intelligently without hurting your sign-up conversion rates. The goal of this initial intake is not to create administrative hurdles, but to gather the vital insights required to deliver a tailored, contextual product experience from day one. When you segment users by their specific roles and objectives, you can guide them directly to their first "Aha-moment." Building a personalized onboarding pipeline is your first and strongest line of defense against early customer churn.
Build Your Optimized Onboarding Pipeline Today
Stop forcing every user through the same generic workflow. Capture actionable personas and route high-value leads automatically.